RSS Feed

Posts Tagged ‘DIY’

  1. Yellow Tomato Basil Jam

    November 14, 2011 by Scooter

    yellow-tomato-basil-jam


    With the abundance of tomatoes and basil we had in the garden this year, I started to do some research as to what to do with it all. This summer, we picked up a pressure canner at the thrift store and suddenly a new hobby was born. Spending time clicking through search engines for different and unique jam recipes, I came across a Yellow Tomato Basil Jam recipe over at Food In Jars… This is a great blog on canning with many recipes!

    yellow_tomato_basil_jam2

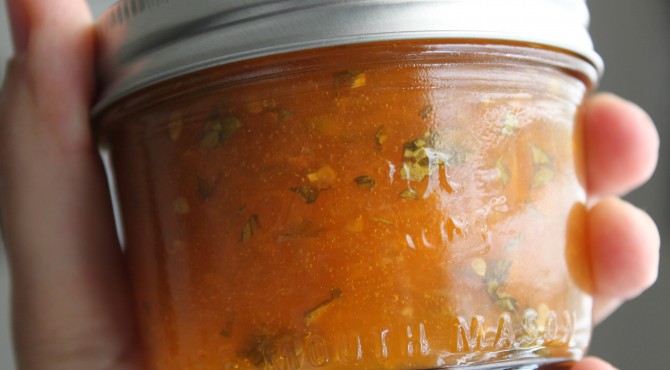
    Yellow Tomato and Basil Jam
    makes 3.5 pints or 7 half pints

    4 pounds Sungold or other yellow tomatoes
    3 cups granulated sugar
    1/2 cup lemon juice
    zest of two lemons, divided
    1/4 cup roughly chopped basil


    Cut Sungold tomatoes in half, or, if using larger yellow tomatoes, chop them into smallish pieces.

    Combine chopped tomatoes with sugar in a large, non-reactive pot and stir. Let sit for at least one hour, or until the tomatoes release their juice.

    When ready to cook, prep canning pot and jars and place jam pot over high heat. Add lemon juice and bring to a boil.

    Cook at a boil for 30-35, stirring frequently, until the tomatoes have softened and the syrup has gotten thick. Check set with plate test. Once you’re satisfied with the set, remove the pot from the heat and stir in half the lemon zest and chopped basil. Taste and add remaining lemon zest only if you feel the jam requires it.

    Pour jam into prepared jars. Wipe rims, apply lids and rings. Process jars in a boiling water bath canner for 10 minutes.

    When time is up, remove jars from pot and let them cool on a kitchen towel. When jars are cool enough to handle, remove rings and test seals. Place any unsealed jars in the refrigerator and use promptly. All sealed jars can be stored in a cool, dark place for up to 1 year.


  2. Shipping Pallet Compost

    October 31, 2011 by Scooter

    compost_final

    Fall is here and the leaves are falling… and what else makes for great compost… but leaves!! Not wanting to have any of our newly raked piles go to waste… we spent an afternoon building a compost bin in hopes that some of that leafy mulch will turn into gardener’s gold come spring!

    COST

    $$ – (Under $26)

    MATERIALS

    4 shipping pallets – Side of the road… (free)
    8 wooden (or metal) stakes/ posts – Habitat for Humanity Outlet… ($)
    Window Screen (optional) – Home Depot … ($)
    Wire – Home Depot… ($)

    TOOLS

    Drill
    Staple Gun
    sledgehammer

    compost_materials

    compost_posts

    We picked up 4 old fencing posts and decided we could cut them in half to get the 8 stakes that we needed… compost_assembly

    Next, we stood the pallets up on their sides to form a square and then hammered in the posts at each end of the pallets. We also drilled 3 of the 4 pallets together for extra stability. The forth pallet gets wired to the other three on the one side to act as a hinge for opening and closing.

    compost_screen2

    Since we have dogs that like to eat just about anything, and squirrels that make a mess of our yard… we decided to line the inside with screen mesh to help prevent spilling out… Using a staple gun, this was secured down…keeping in mind of the pallet that will swing open.

    compost_pug

    compost_final


  3. Halloween Wreath

    October 10, 2011 by Scooter

    Halloween Wreath_Putting on snakes

    This project was inspired by the Wriggling Snake Wreath over at MarthaStewart.com!

    COST
    $$ – (Under $26)

    MATERIALS
    black acrylic paint – Hobby Lobby… (under $3)
    vinyl snakes – Halloween or toy store, we found a bag of 8… (under $10)
    Floral wire, 20-gauge – Hobby Lobby… (under $3)
    Black water-based spray paint – had around the house… (free)
    18-inch grapevine wreath – .. (under $5)
    1 75pk of creepy creatures – Big Lots… (under $5)

    TOOLS
    Paintbrush

    Halloween Wreath- Grapevine Wreath

    Halloween Wreath- Spray paint

    Paint grapevine wreath using water-based spray paint; let dry.

    Halloween Wreath- Painted Black

    Halloween Wreath- Vinyl Snakes

    Halloween Wreath- Acrylic Paint

    Paint vinyl snakes in assorted shapes and sizes using acrylic paint; let dry.

    Halloween Wreath- Pug

    Halloween Wreath- Painted SnakesHalloween Wreath_creepy creaturesHalloween Wreath_Finished

    Attach snakes, spiders, bats and any other creepy crawly creature to wreath: For flat snakes, twist floral wire around in 2 places, thread wire into wreath, and secure at back. Coiled snakes can simply be wrapped around wreath.

    Halloween Wreath_On the Door


  4. Spoon Mug Wall

    October 3, 2011 by Scooter

    Spoon Mug Wall

    This project was inspired by the Snug Mug Spoon Wall over at ReadyMade!

    COST
    $$ – (Under $45)

    MATERIALS
    scrap cabinet grade plywood – found in alleyway… (free)
    assortment of spoons – thrift store… (under $4)
    Nuts, Bolts, and Washers – price depends on size. we wanted large, so spent a bit more… (under $10)
    2 36″ square steel tubing – $5.57 each… (under $12)
    2 Flat Brackets – depends on size of your board. We went with 48″ brackets @ 6.51 each.. ($13)
    Steel Adhesive – we went with SteelStik… (under $6)
    Burlap Coffee Sack (optional) – had around the house…(free)

    TOOLS
    Drill
    Ratchet
    Tin-snips

    Spoon Wall - Nuts and Bolts

    Spoon Wall- Spoon with fan reflection

    First we arranged the spoons and the steel bars on the board…

    Spoon Wall- Spoon Materials

    Now, take a hacksaw and score the spoons and the steel tubing where they will attach. Next we took SteelStik and adhered the spoons.

    Spoon Wall- Scoring

    Spoon Wall- SteelStik

    Spoon Wall- Adhesive

    Spoon Wall- Placing Spoons

    Spoon Wall w/ Pug looking on...

    Set up the brackets and mark where you would like the bolts to go… We did 4 on each side between each bar.
    Next, drill the holes…

    Spoon Wall- Drill Holes

    Spoon Wall- Trim Brackets

    We then set it up and trimmed the brackets. We had a coffee sack lying around that we thought would make for a nice cover to the board.

    Spoon Wall Mockup w/ coffee sack
    Last we added some mounting wire onto the back and the spoon mug wall has been created!

    Spoon Wall- Mount

    Spoon Wall- Bolting it down

    Spoon Mug Wall