RSS Feed

October, 2011

  1. Shipping Pallet Compost

    October 31, 2011 by Scooter

    compost_final

    Fall is here and the leaves are falling… and what else makes for great compost… but leaves!! Not wanting to have any of our newly raked piles go to waste… we spent an afternoon building a compost bin in hopes that some of that leafy mulch will turn into gardener’s gold come spring!

    COST

    $$ – (Under $26)

    MATERIALS

    4 shipping pallets – Side of the road… (free)
    8 wooden (or metal) stakes/ posts – Habitat for Humanity Outlet… ($)
    Window Screen (optional) – Home Depot … ($)
    Wire – Home Depot… ($)

    TOOLS

    Drill
    Staple Gun
    sledgehammer

    compost_materials

    compost_posts

    We picked up 4 old fencing posts and decided we could cut them in half to get the 8 stakes that we needed… compost_assembly

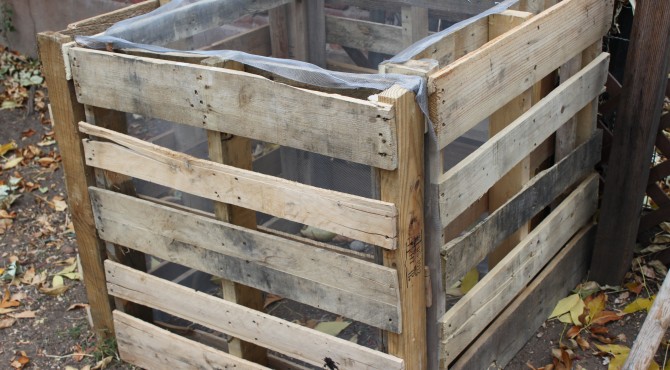
    Next, we stood the pallets up on their sides to form a square and then hammered in the posts at each end of the pallets. We also drilled 3 of the 4 pallets together for extra stability. The forth pallet gets wired to the other three on the one side to act as a hinge for opening and closing.

    compost_screen2

    Since we have dogs that like to eat just about anything, and squirrels that make a mess of our yard… we decided to line the inside with screen mesh to help prevent spilling out… Using a staple gun, this was secured down…keeping in mind of the pallet that will swing open.

    compost_pug

    compost_final


  2. Zombie Pumpkins

    October 24, 2011 by Scooter

    zombie_pumpkin_yellow

    Its a week until Halloween!… and we live in a house, in a neighborhood, with lots of kids… so lets google zombie pumpkins and see what comes up:)… I found this Zombie Pumpkin Project over at Martha Stewart.


    COST
    $$ – (Under $15)

    MATERIALS
    2 White Pumpkins – Grocery Store/ Pumpkin Patch… ($6)
    Plastic balls – Thrift Store… ($3)
    Paint/ Markers – Lying around the house… (free)

    TOOLS
    Knife / Miniature Saw

    zombie pumpkins_white

    zombie pumpkins_eye_holes

    I found these beautiful white pumpkins while grocery shopping…

    For the eyes, hold saw at an angle and cut 2 cone-shaped holes into the pumpkin. The diameter of the holes should be slightly smaller than the eyeballs’ diameter.

    zombie_pumpkin_paint

    zombie_pumpkin_carving

    Since I could not find plastic eyeballs, I ended up picking up a giant bag of colored plastic balls (like the ones you jumped in as a kid) at a thrift store. I had markers and paint in the closet, and decided we would have a little art project making these eyeballs 🙂

    zombie pumpkins__eyeballs

    Next, carve a mouth… There are templates over on Martha’s website…

    zombie_pumpkin_yellow

    zombie_pumpkin_green

    She also did this Mouse Motel which I had to throw into our mix! I found the mice at a halloween store for under $1 each..
    mice_pumpkin

    mice_pumpkin_2

    Of course, the neighbors had warned us that the squirrels will eat the pumpkins if we leave them out… sure enough, within 24 hours the zombie pumpkins had their eyes gnawed on, which zombie-fyed them even more :)… But we brought them inside to enjoy until Halloween night 🙂

    zombie pumpkin_all


  3. Concord Grape Jam

    October 18, 2011 by Scooter

    Concord Grape Jam_Jars

    This weekend I decided that I wanted to make Concord Grape Jam after reading the tutorial on it over at  The Hungry Moose Blog. As detailed as their recipe was with all the visuals… I still managed to mess this one up. Mine came out way too runny and only managed to make half the amount :(… Though it was still delicious, I may need to invest in a better strainer (this was the part I found to be the most difficult)… or possibly a food mill.

    Concord Grape Jam_Grapes

    Concord Grape Jam
    makes 4 pints


    3 lbs. concord grapes
    3 cups sugar
    2 Tbls. lemon juice


    1. Skin the Grapes

    Concord Grape Jam_Skinned

    Concord Grape Jam_Seperated


    2. Puree the Grape Skins
    Put skins and 1 cup of sugar in the food processor and process them on high for a minute or two.

    Concord Grape Jam_Food Processor

    3. Cook the Concord Grape Jam
    Put the pureed skins, peeled grapes, lemon juice and the remaining 2 cups of sugar in a medium pot over high heat and bring it to a boil. Stir occasionally.

    Once it reaches boiling, reduce to a simmer and cook for 20 minutes, stirring frequently.

    After 20 minutes, your jam will have thickened and reduced.

    Concord Grape Jam_Boiling
    4. Strain the Jam
    Before you start, grab a plate and put it in the freezer. You’ll need it to test the jam in a few minutes.

    With a spatula, push the jam through a strainer in a large, heat-proof bowl. You should be left with seedy pulp…

    5. Run the Plate Test

    6Jar your Jam!

    Ladle your warm jam into clean, sterilized jars. Let them cool to room temperature, then cover them and pop them in the fridge.

    Concord Grape Jam_Finished


  4. Halloween Wreath

    October 10, 2011 by Scooter

    Halloween Wreath_Putting on snakes

    This project was inspired by the Wriggling Snake Wreath over at MarthaStewart.com!

    COST
    $$ – (Under $26)

    MATERIALS
    black acrylic paint – Hobby Lobby… (under $3)
    vinyl snakes – Halloween or toy store, we found a bag of 8… (under $10)
    Floral wire, 20-gauge – Hobby Lobby… (under $3)
    Black water-based spray paint – had around the house… (free)
    18-inch grapevine wreath – .. (under $5)
    1 75pk of creepy creatures – Big Lots… (under $5)

    TOOLS
    Paintbrush

    Halloween Wreath- Grapevine Wreath

    Halloween Wreath- Spray paint

    Paint grapevine wreath using water-based spray paint; let dry.

    Halloween Wreath- Painted Black

    Halloween Wreath- Vinyl Snakes

    Halloween Wreath- Acrylic Paint

    Paint vinyl snakes in assorted shapes and sizes using acrylic paint; let dry.

    Halloween Wreath- Pug

    Halloween Wreath- Painted SnakesHalloween Wreath_creepy creaturesHalloween Wreath_Finished

    Attach snakes, spiders, bats and any other creepy crawly creature to wreath: For flat snakes, twist floral wire around in 2 places, thread wire into wreath, and secure at back. Coiled snakes can simply be wrapped around wreath.

    Halloween Wreath_On the Door


  5. Spoon Mug Wall

    October 3, 2011 by Scooter

    Spoon Mug Wall

    This project was inspired by the Snug Mug Spoon Wall over at ReadyMade!

    COST
    $$ – (Under $45)

    MATERIALS
    scrap cabinet grade plywood – found in alleyway… (free)
    assortment of spoons – thrift store… (under $4)
    Nuts, Bolts, and Washers – price depends on size. we wanted large, so spent a bit more… (under $10)
    2 36″ square steel tubing – $5.57 each… (under $12)
    2 Flat Brackets – depends on size of your board. We went with 48″ brackets @ 6.51 each.. ($13)
    Steel Adhesive – we went with SteelStik… (under $6)
    Burlap Coffee Sack (optional) – had around the house…(free)

    TOOLS
    Drill
    Ratchet
    Tin-snips

    Spoon Wall - Nuts and Bolts

    Spoon Wall- Spoon with fan reflection

    First we arranged the spoons and the steel bars on the board…

    Spoon Wall- Spoon Materials

    Now, take a hacksaw and score the spoons and the steel tubing where they will attach. Next we took SteelStik and adhered the spoons.

    Spoon Wall- Scoring

    Spoon Wall- SteelStik

    Spoon Wall- Adhesive

    Spoon Wall- Placing Spoons

    Spoon Wall w/ Pug looking on...

    Set up the brackets and mark where you would like the bolts to go… We did 4 on each side between each bar.
    Next, drill the holes…

    Spoon Wall- Drill Holes

    Spoon Wall- Trim Brackets

    We then set it up and trimmed the brackets. We had a coffee sack lying around that we thought would make for a nice cover to the board.

    Spoon Wall Mockup w/ coffee sack
    Last we added some mounting wire onto the back and the spoon mug wall has been created!

    Spoon Wall- Mount

    Spoon Wall- Bolting it down

    Spoon Mug Wall